home

The Budget Dining Room Project

Summer is quickly coming to an end and I can’t say I am disappointed this year.  Don’t get me wrong, summer is my jam and will forever hold my heart tight, but this summer was overly hot and oppressive.  Nothing other than the bare minimum was done outside.  Even the pool felt my neglect!

Now that our office is pretty much complete and I have been picking up small projects around here, the dining room is my next big focus.  We have been handed the torch to host the holidays and the only room that has been untouched downstairs is our dining room.  Sadly, it spent the first eight months of our living here as a dumping ground for things that did not have a home.

Dining Room Before

What helped the clutter problem was actually adding storage to our office and switching out our tv entertainment stand.  After that, it was a domino effect for our things to find their place.  diningroombefore2

Right now, I am playing around with light fixture ideas because as close as we are to the holidays and with some of the other project goals we have, I do not really have much of a budget for this room.  diningroombefore3

This room is tricky to shoot and it is on me to get the right lighting equipment.  There is a green tint on our windows to help with UV rays and it comes through in all of my pictures!diningroombefore4

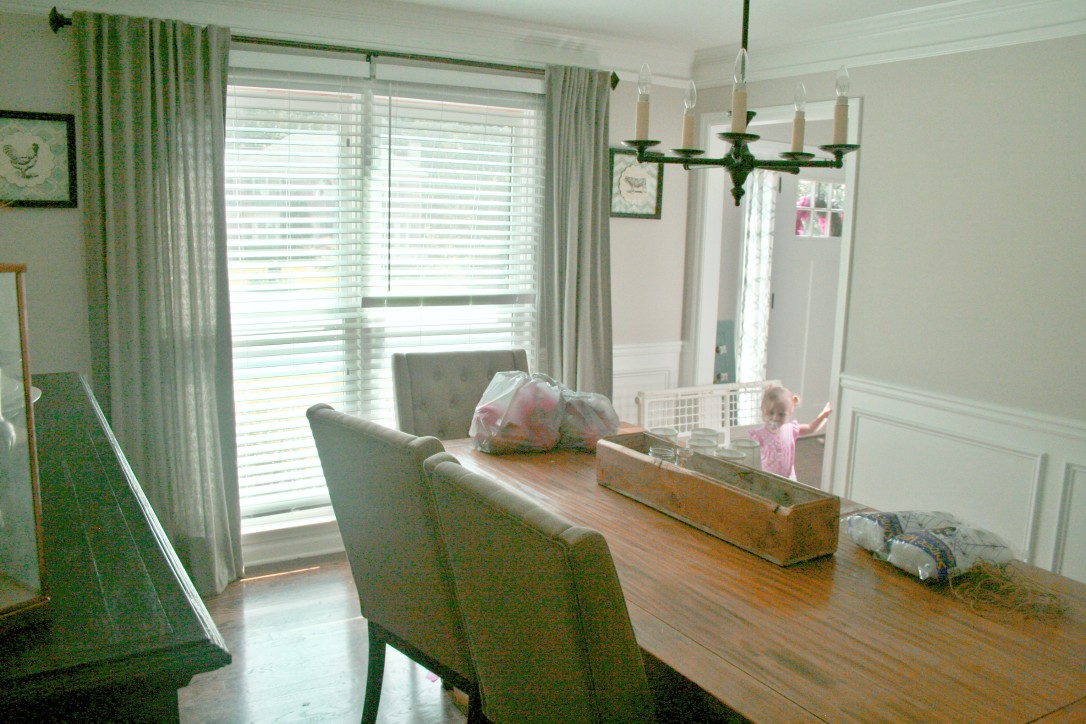
But it is a pretty bright space in the early afternoon until dusk.

What I want to do in there:

Screen Shot 2017-09-15 at 2.48.11 PM

This room has the wonderful (and real) wainscoting all around the room so that is 100% staying.  The furniture is not changing either.  I want to keep the “theme” modern farmhouse.  Since I have that wainscoting, shiplap makes no sense in here and I don’t want to be too “farmy.”  Our house doesn’t hold that look well, sadly.

My punch list:

  1. Update the light fixture
  2. Paint the walls – I am shooting for Sherwin Williams Sea Salt
  3. Organize the buffet
  4. Buy a rug
  5. Decorate with as much on hand items
  6. Add my own floral paintings to the room.  Or buy them, we will see how my creations turn out
  7. Switch out all the outlets and outlet covers from beige to white
  8. POSSIBLY add shelves….possibly!

Not an overwhelming list by any means!  Honestly, this is a weekend’s work!

home

Farmhouse Candle Sticks

I meant to get this post up at some point last week, but I have been sick and traveling and I was just too tired at night to open my computer and think.

Last weekend, I was cleaning up the house a little bit and was focusing on cleaning up our family room because with a toddler, toys.are.everywhere!  While I was cleaning up, I started thinking about how my fireplace mantle could finally use a small update.  It had sort of became the place where I just threw things up as I was unpacking and left it alone.

Fireplace_before

So, deciding to spend almost no money on this, I started looking around the house and playing with what I had.

A few years ago, I purchased two gold candle sticks from Everything but the House, with no actual plans for them.  I wanted to use them on the mantle but not in the current state.  I still like gold accessories, but these were just so dated and not the style of the room.

What I really wanted was something that looked more rustic and would fit the style of our room.  Something like this:

carved-pillar-holder-o
Pottery Barn

I did a lot of looking around and it looks like most versions of this candle stick are made from wood.  I didn’t want to totally ditch what I had because I already had them.  So I figured I would play around with paint and see what I could do.  If it was a total fail, I would just paint them a solid color.

I bought the Martha Stewart Vintage Decor paint in Linen and Clay.  These had a matte, chalky finish, so I figured I could apply and sand where I wanted to distress.  Also, I was lucky timing-wise that they were buy one get one half off at Michaels because they are a little pricey.

The rest was pretty easy.  I applied two coats of the clay and followed the instructions on the back of the bottle.  Apply and let cure.  I was purposely sloppy with how the paint went on because it was going to be sanded down.

Candlestick_during

After the clay covered completely, I applied two coats of linen and let dry overnight.  Again, not really caring how smooth the paint went on.

Candlestick_during_homedownsouthblog

My plan was to sand most of the linen off the top and expose most of the clay.  Sanding was not going the way I thought it would.  It took a lot of effort to sand and when I made it through the top layers, it went straight back down to the gold.  Hmm

Plan B: Dry brush* the clay over the top and hope it looks good.  And that is what I did for both.

*Dry brushing is when you dip your brush into a little paint, wipe it on a paper towel or paper plate and then paint your piece.  It cuts down the coverage and gives it the look that I spent all day sanding.

candlestick_after_homedownsouthblog

I was so happy I was not particular about how the bottom layers of paint went on because it created this really nice groove effect on the top to give it way more dimension.

I totally eyeballed how much to put on and when to stop.

fireplace_after_homedownsouthblog

I mounted the long window I actually found in the trash back when I was looking for wedding decor.  I think it is such a cool piece and lucky me to find it.

Such an easy and cheap project to take off the to-do list!  I am brainstorming ideas for a new screen.  I will tackle that once we have the fireplace serviced.  When we bought the house, the seller was in the process of switching it from gas to electric and just stopped halfway through.  So we are going to hire someone to come take a look and make sure it works in time for winter.

home

Shared Home Office Reveal

I am about to climb on the roof of my house to shout to the neighborhood that my office is DONE!  This has been such a HEFTY project and took way longer than I had hoped but mainly because I did all of this by myself!!

I was planning on writing up a post on how to customize boring stock cabinets, and I still can, if you are interested.  But for now, let’s just talk about how this room came together and I was finally able to clean it out last night!!

Let’s flashback to where we were when we first started:

The room lacked any type of storage and any sort of personality.  Storage was BIG for us because at the time I took these pictures, there were still boxes from moving that needed a home.

I ended up getting a later start on this project because I was not sure what direction I wanted to go with shelving.  I was going to be sharing this space as well so I needed to make sure we both agreed on what I was going to do.

Here you can read about the design plan

When things finally got moving, there were a bunch more hiccups than I had hoped for.  The shelves were a pain to deal with.  Then, while upgrading the cabinets with new and existing trim, so many things got annoying that I had to walk away and rethink.  Painting only takes forever when you do not have a paint sprayer.  And switching out old outlets for new in a house with annoying wiring is, well, annoying! HA

Let’s just jump into the reveal already!  I will try to source everything I can below each picture, but if there is something you see and have a question on, let me know!

Homedownsouth Office Reveal1

I am so happy this is done!  There are a few things I still to take care of in here: fix the front gaps where the cabinets meet the wall, find a plant for the desk, and scrape any paint off the floor.

The desk is from Cost Plus World Market.  It was a tough one to get because it was on backorder for a minute.

HomeDownSouth Office Reveal 2

I am currently not a big fan of the camera I am using because it really ran with the green tint coming in from the windows, I assume?  The cabinets are painted Glidden Stone White.  It is really pretty.  It is gray in some light, white-ish in others.  Green apparently to my camera 😦HomeDownSouth Office Reveal 3

HomeDownSouth Office Reveal 4

Honestly, I am still getting used to the shelves.  I love them but I am not used to having ALL THE THINGS up on the wall.  HomeDownSouth Office Reveal 5

HomeDownSouth Office Reveal 6

There was a lot of going back and forth on what knobs I wanted in here.  Honestly, I did not have the budget to spend anything more than a few dollars on hardware, but I wanted something a little more unique than what you would find in a big box.  I ended up finding mine at Hobby Lobby on sale for 50% off!

HomeDownSouth Office Reveal 8

The chaise is from a local warehouse outlet store but I am pretty sure it originally came from Ashley Furniture.  The Georgia G and the lamp were local thrift finds.  I need to replace the brown pillow that came with chaise, but I have not seen anything that made me stop in my tracks.HomeDownSouth Office Reveal 7 We are each getting one cabinet to do whatever with it.  I have already organized all the craft supplies I wanted to keep and move out of our hall closet to my side (which is the more decorated side because not everyone has had a chance to play around).  I’ll share what I did in my cabinet for another post.

What do you think?

Now that this space is finally done, I can start focusing on the next room, our dining room.  We have been handed the Thanksgiving host torch and the room is in shambles right now …so stay tuned!